Category: Uncategorized

  • How to Plan a Custom Resistance Band Line: Specs, Tiers, and Order Math

    How to Plan a Custom Resistance Band Line: Specs, Tiers, and Order Math

    The first decision in a custom booty band line is not the color or the logo. It is the resistance ladder: how many levels you sell, how far apart they sit, and how a buyer is supposed to progress through them. Get that right and everything downstream, from sampling to packaging, becomes a series of small confirmations. Get it wrong and you end up with three bands that all feel roughly the same, or a “heavy” that only advanced lifters can use. This walkthrough moves from resistance, to material, to sizing, to the order math, so you can specify a line that actually holds together.

    Start with the resistance ladder, not the color

    Loop bands are usually sold in color-coded tiers, and while the colors are not standardized across the industry, the spacing between tiers is what matters. A common five-step ladder runs roughly from 10–15 lb of pull at the light end up to 30–35 lb at the extra-heavy end, measured at a normal working stretch. Those figures are indicative rather than exact: the force a band delivers depends on how far it is stretched, so two bands rated “heavy” can feel different if their resting circumference is different. When you plan your ladder, decide first how many levels you want a customer to own at once. A three-band set that steps light, medium, and heavy suits a general fitness brand; a five-band set gives serious lifters more room to progress but raises your per-set cost and your inventory complexity.
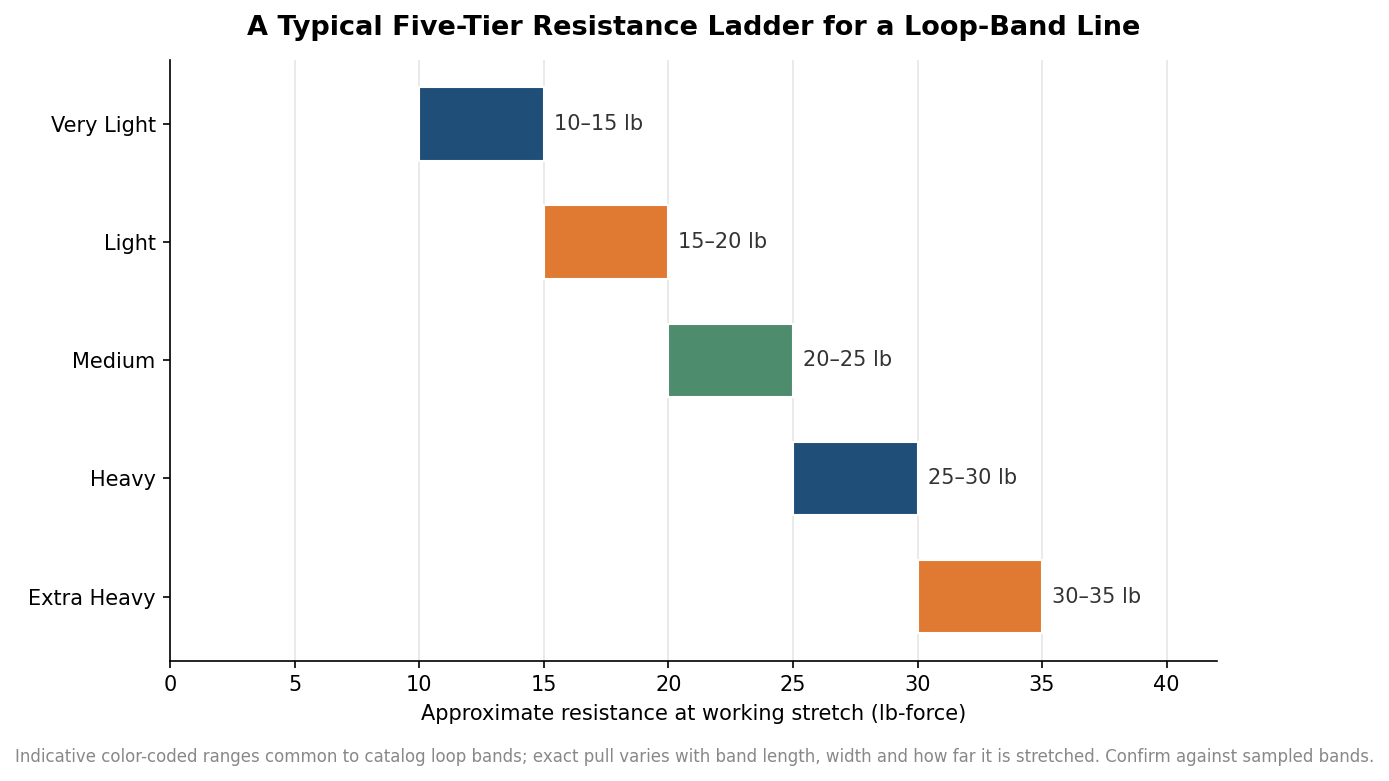
    Horizontal bar chart of a five-tier resistance ladder from very light 10 to 15 pounds up to extra heavy 30 to 35 pounds
    A five-tier ladder with even spacing; confirm actual pull on sampled bands at a stated stretch.

    Whatever spacing you choose, keep the jumps even and test them on real bodies before you commit. The most common complaint about budget sets is that the two lightest bands feel identical while the gap to the heaviest is a cliff. If you are sourcing from a factory catalog, ask for the pull values at a stated stretch, not just the color names, and verify them on your own samples.

    Fabric or latex decides most of the line

    Material is the fork in the road. Fabric bands, typically a cotton and polyester weave over an internal elastic, do not roll or snap up the leg during hip work, which is why they dominate the glute-training niche. Their trade-off is that resistance comes mainly from length and weave rather than thickness, so a fabric line usually tops out at two or three meaningful levels and the bands can stretch or fray over a long life of hard use. Latex loop bands, by contrast, are rated by thickness, commonly in the range of about 0.15 mm to 1.2 mm with a stretch ratio around six to seven times their resting length. That lets a latex line offer five or more distinct levels for upper and lower body work, at the cost of the roll-up behavior lifters dislike during heavy hip thrusts, and the need to warn latex-sensitive customers.

    Many brands split the difference by selling fabric bands for the lower-body, booty-focused range and a separate latex or TPE set for full-body training. If a latex-free promise matters to your audience, thermoplastic elastomer is the usual hypoallergenic substitute; it is worth sampling because the hand-feel and durability differ from natural latex. Decide this early, because it changes your sizing chart, your packaging claims, and your compliance paperwork.

    Sizing and construction details buyers notice

    Fabric glute bands are usually specified by lay-flat circumference and width. Widths across catalog loop bands span roughly half an inch up to about 3.25 inches, and the wider, taller bands are the ones marketed for hip and glute work because they stay put above the knee. Circumference is where a line lives or dies: too long and the band offers little tension on smaller users, too short and it digs in. A practical approach is to offer a small number of loop lengths, often in the region of 12 to 15 inches lay-flat for above-the-knee use, and to state the intended stretch range plainly so a customer can self-select. These lengths are indicative; confirm them against your own fit testing with the exact weave you are buying.

    Construction details separate a premium band from a giveaway. Look at whether the seam is bar-tacked or simply overlocked, whether a printed silicone grip strip is applied to the inner face to stop migration, and how the branding is applied. Sublimation prints the full band face and survives washing well; woven jacquard builds the pattern into the fabric for a higher-end look; silicone or screen print sits on the surface and is cheaper but wears at the stress points. Each method carries its own setup cost and minimum, which feeds directly into your order math.

    Order math: minimums, lead times, and cost drivers

    Plan your first buy around the factory’s tiers, not a round number you picked. Sample rounds are usually small, in the range of a handful to a few dozen pieces, and take a few days to about a week and a half to produce after you confirm artwork. Trial production commonly starts around 100 to 300 pieces per design, with standard production tiers at 500 to 1,000 and bulk pricing kicking in above 1,000 pieces. Those are per-design minimums, so a five-color set multiplies quickly: a “small” launch of 300 sets in five colors is really 1,500 bands.
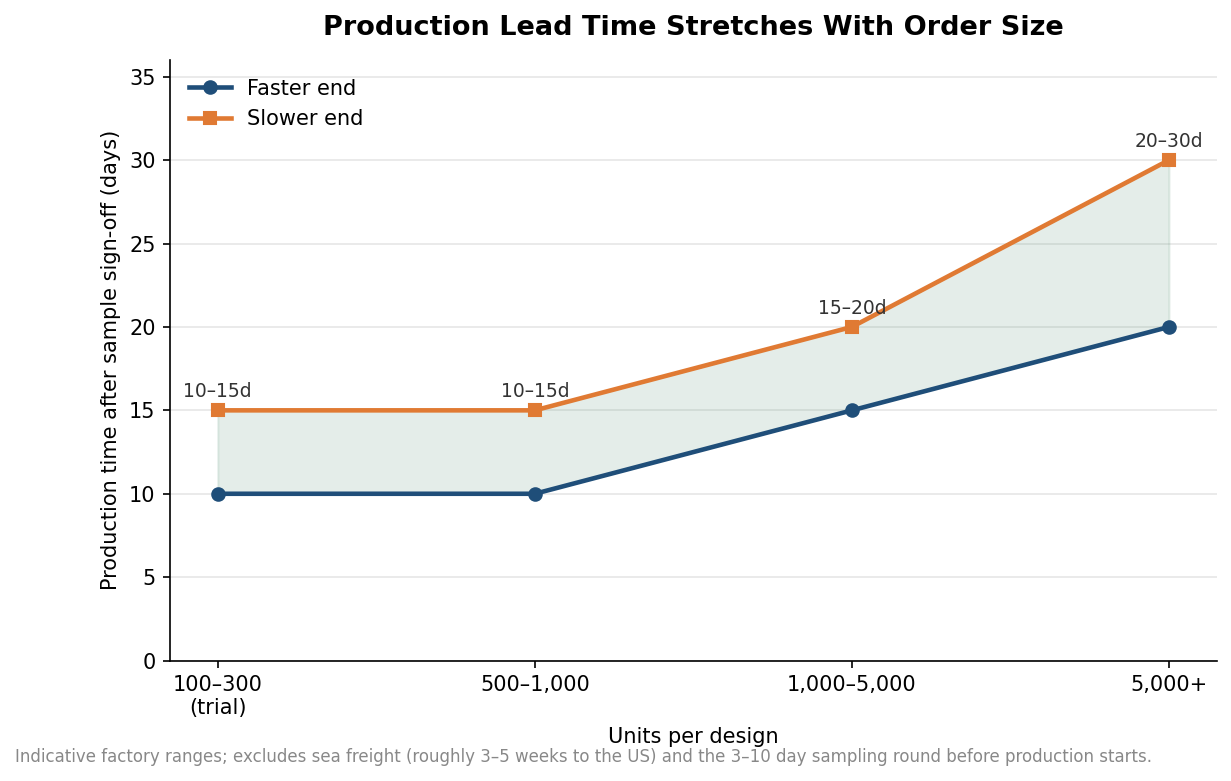
    Line chart showing production lead time in days rising with order size from 10 to 15 days at small runs to 20 to 30 days above 5,000 units
    Production time after sample sign-off, before freight, widens as order quantity grows.

    Lead time scales with quantity. After sample sign-off, a run of 500 to 1,000 units often takes on the order of 10 to 15 days to produce, 1,000 to 5,000 units 15 to 20 days, and larger runs 20 to 30 days, before any freight. If you are importing, add several weeks of sea transit and build that into your launch calendar. On cost, the biggest swing factors are the number of print colors, whether a new silicone grip mold is required, packaging, and the material itself. Retail comparisons are a rough sanity check rather than a costing tool: fabric three-band packs commonly sell around 20 to 40 dollars and five-band latex sets around 15 to 40 dollars, so your landed cost per set has to leave room under those prices.

    Compliance and packaging before you launch

    Because bands are a consumer product used against skin and sometimes near children, the paperwork is not optional. Reputable factories can supply REACH and RoHS documentation and often hold ISO 9001 quality certification; if your bands could be construed as reaching children or you sell into the EU, ask specifically about the relevant toy-safety and chemical limits and get the test report in writing rather than accepting a checkbox. Latex content has to be disclosed for allergy reasons, and a latex-free claim needs to match the actual material. Finally, treat packaging as part of the spec, not an afterthought: a printed sleeve or box, a mesh carry bag, and a clear resistance guide on the pack all carry their own minimums and lead times, and they are the difference between a band that looks like a promotional freebie and one a customer will pay a retail price for. Lock these details before the first production run, and your launch becomes a matter of confirming samples rather than fixing surprises.
  • How to Put Your Logo on Fabric Booty Bands: Sublimation, Silicone, and Woven Jacquard Compared

    How to Put Your Logo on Fabric Booty Bands: Sublimation, Silicone, and Woven Jacquard Compared

    The whole point of a custom booty band is the logo on it, and the method used to put that logo on a stretchy fabric band decides far more than most buyers expect. The same artwork can end up full-color and smooth, or two-tone and grippy, or woven into the weave itself, and each of those routes changes the color range you can use, how the band feels, whether the print adds grip or just sits there, how it survives the wash, and how many pieces you have to order to make it economical. Three methods do almost all of this work on fabric bands, and choosing between them is really a sequence of three questions.

    Question one: how much color does the logo need

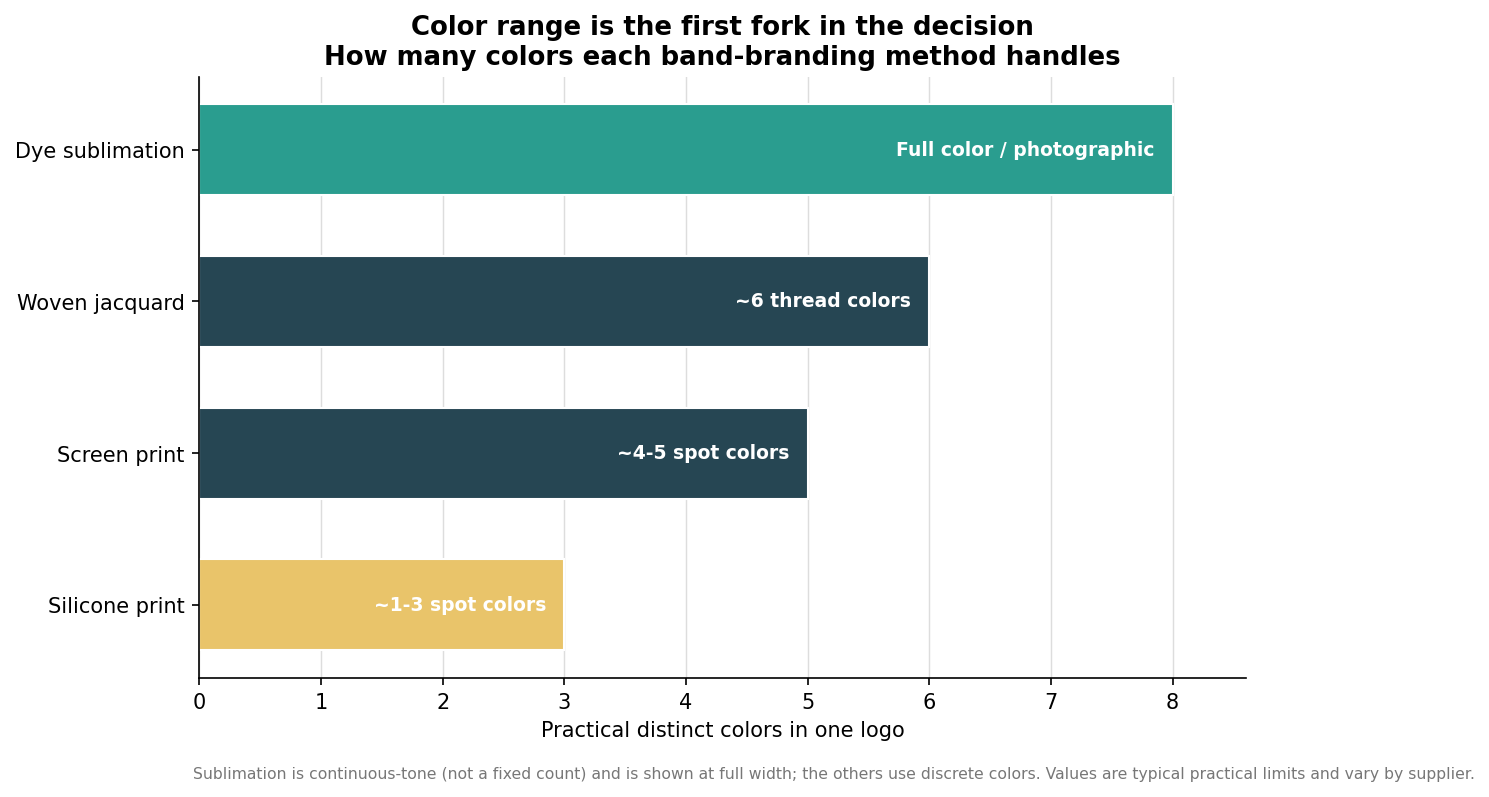
    Start with the artwork, because color capability is where the methods separate most sharply. Dye sublimation prints full-color, photographic artwork with gradients and fine detail at no extra cost per color. Silicone printing and screen printing lay down spot colors, typically a small handful, and reproduce solid shapes and text far better than they reproduce a photo or a blend. Woven jacquard does not print at all; the logo is formed from colored threads in the weave, which limits you to a modest palette of thread colors. The chart lays the range out.

    Horizontal bar chart of practical color range by band-branding method, from full-color dye sublimation to about three spot colors for silicone print
    Color range is the first split: sublimation is photographic, while silicone, screen, and jacquard use limited colors.

    Let the logo pick the lane. A detailed, multicolor, or gradient mark points to sublimation, because forcing it into three spot colors means redrawing it. A clean one- or two-color wordmark or icon is a perfect fit for silicone or screen, and often looks more premium as a solid, tactile print than as a photographic one. A heritage or retail brand that wants its logo to read as part of the fabric, not a layer on it, is the case for jacquard. There is no universally best method here, only the best match for the specific artwork.

    Question two: how should it feel and how long should it last

    How the decoration sits on the band determines both its hand and its lifespan, and this is where booty bands differ from a T-shirt. Sublimation dyes the fiber itself, so the color becomes part of the fabric, stays perfectly smooth, and will not crack, peel, or fade through repeated washing, but because it is smooth it adds no grip. Silicone printing sits up as a raised, rubbery layer that is cured onto the band at roughly 120 to 150 degrees Celsius; it stretches with the band, holds up well, and adds real slip resistance, which on a hip band is a feature rather than a side effect because it helps the band bite instead of rolling. Woven jacquard is the most durable of all because the design is structural thread rather than anything applied on top, with a textured, high-end look, though it trades away color range and fine detail to get there. Ordinary screen print, the fourth option, sits on the surface like silicone but without the same elasticity, so on a band that stretches hard it is the most likely to crack over time, which is why it is the least common choice for this product.

    Question three: how many are you ordering

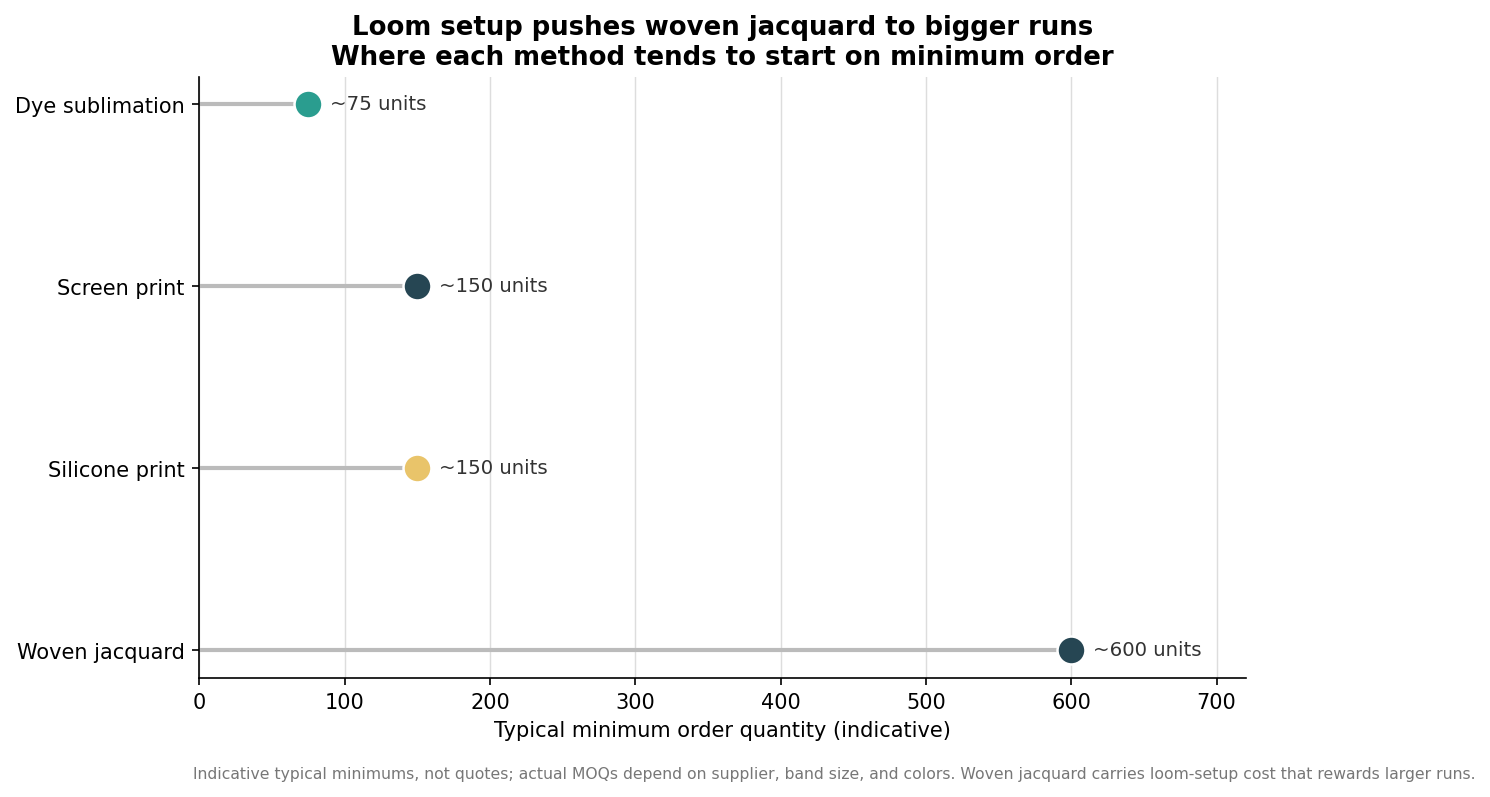
    Minimum order quantity is the practical constraint that often makes the decision, because the setup economics differ by method. Sublimation carries little fixed setup, so it supports the smallest runs and suits a new line testing a full-color design. Silicone and screen printing sit in the middle, needing screens or films that reward a few hundred pieces. Woven jacquard carries the cost of warping a loom for your specific design, which is why its minimums run highest and its value shows up only at volume. The indicative starting points below show the pattern, though they are typical ranges rather than quotes.

    Lollipop chart of indicative typical minimum order quantities by method, from about 75 units for sublimation to about 600 for woven jacquard
    Setup economics set the floor: sublimation starts small, woven jacquard rewards larger runs.

    Read those numbers as tendencies, not promises. A new brand ordering its first hundred bands in a photographic design is naturally pushed toward sublimation, while an established gym chain reordering thousands of a simple two-color band can justify the loom setup for jacquard or the screens for silicone and get a lower per-unit price at that scale. The order size and the artwork usually point at the same answer once you lay them side by side.

    Matching the method to how a booty band is used

    The last filter is the product’s job. A booty band is worn against skin or leggings, stretched hard, and expected not to roll, so the decoration interacts with performance in a way a flat garment print does not. That is what makes silicone the workhorse for this category: a silicone logo or a band of silicone dots doubles as an anti-roll grip while carrying the brand, so the branding earns its keep twice. Sublimation is the choice when the visual identity is a full-color allover pattern and grip is handled separately, but remember it needs a polyester or poly-coated band and reads most accurately on lighter base colors, since it cannot print white or lighten a dark fabric. Jacquard suits a premium retail line where a woven-in logo signals quality and the order volume supports it. Fabric-versus-latex construction and resistance rating are separate decisions, but the branding method should be chosen with the band’s stretch and grip in mind, not treated as an afterthought.

    For buyers writing the spec, the sequence is what matters: match the method to the logo’s color needs first, then to the feel and durability you want, then to the quantity you can commit to. Full-color and low volume lean sublimation; solid-color with grip leans silicone; woven-in premium at scale leans jacquard. Custom printed bands commonly start in the low hundreds, land in the low single dollars per unit depending on method, size, and colors, and ship within roughly two to four weeks after art approval, though those figures are indicative and vary by supplier and decoration route. Decide the branding method deliberately and it reinforces the product; leave it to default and it can quietly undercut both the look and the grip.

  • Why Two “Heavy” Booty Bands Feel Different: How Fabric Band Resistance Is Really Rated

    Why Two “Heavy” Booty Bands Feel Different: How Fabric Band Resistance Is Really Rated

    Order two booty bands both labeled “heavy,” and there is a good chance they will not feel the same in a hip thrust. One might bite hard from the first inch of stretch while the other eases in and never quite challenges your best lifters. Neither is defective. The uncomfortable truth for anyone building a custom band line is that “light,” “medium,” and “heavy” are marketing words, not measured specifications, and the number that actually matters — pounds of resistance at a given stretch — is set by the band’s dimensions and material, not by the label you print on the sleeve. Understanding that is the difference between a set that feels coherent from light to heavy and one that gets returned because the levels are all over the place.

    There is no industry standard for “light, medium, heavy”

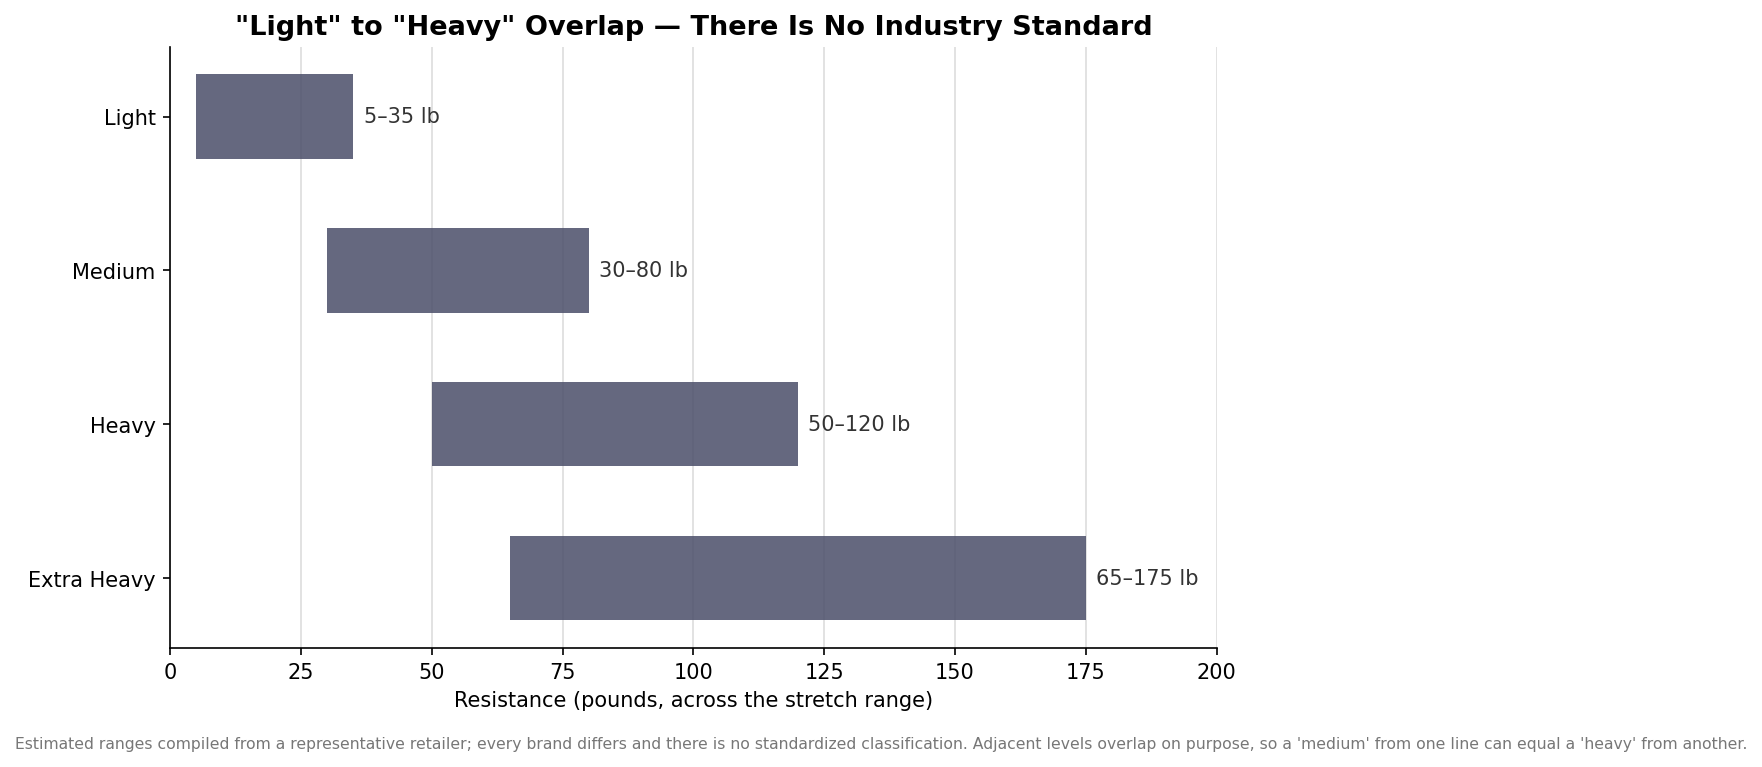
    No governing body defines what those words mean. Retail guidance says so plainly: resistance labels and colors “vary between manufacturers,” and buyers are told to choose by the listed resistance range rather than the name on the band. The practical result is heavy overlap between adjacent levels. In one representative compilation, a “light” band spans roughly 5 to 35 pounds across its stretch, “medium” 30 to 80, “heavy” 50 to 120, and “extra heavy” 65 to 175 or more — ranges that step up but also collide, so the top of one factory’s “medium” can equal the bottom of another’s “heavy.” Fabric hip bands typically sit toward the lower end of those spans, but the lesson holds: if you specify a set by adjective alone, you are leaving the actual feel of your product to whatever the factory’s house scale happens to be.

    Floating bar chart of resistance ranges by level showing overlap: light 5 to 35, medium 30 to 80, heavy 50 to 120, extra heavy 65 to 175 pounds
    Level labels overlap and vary by brand; specify by measured pounds, not by the adjective.

    What actually sets a fabric band’s resistance

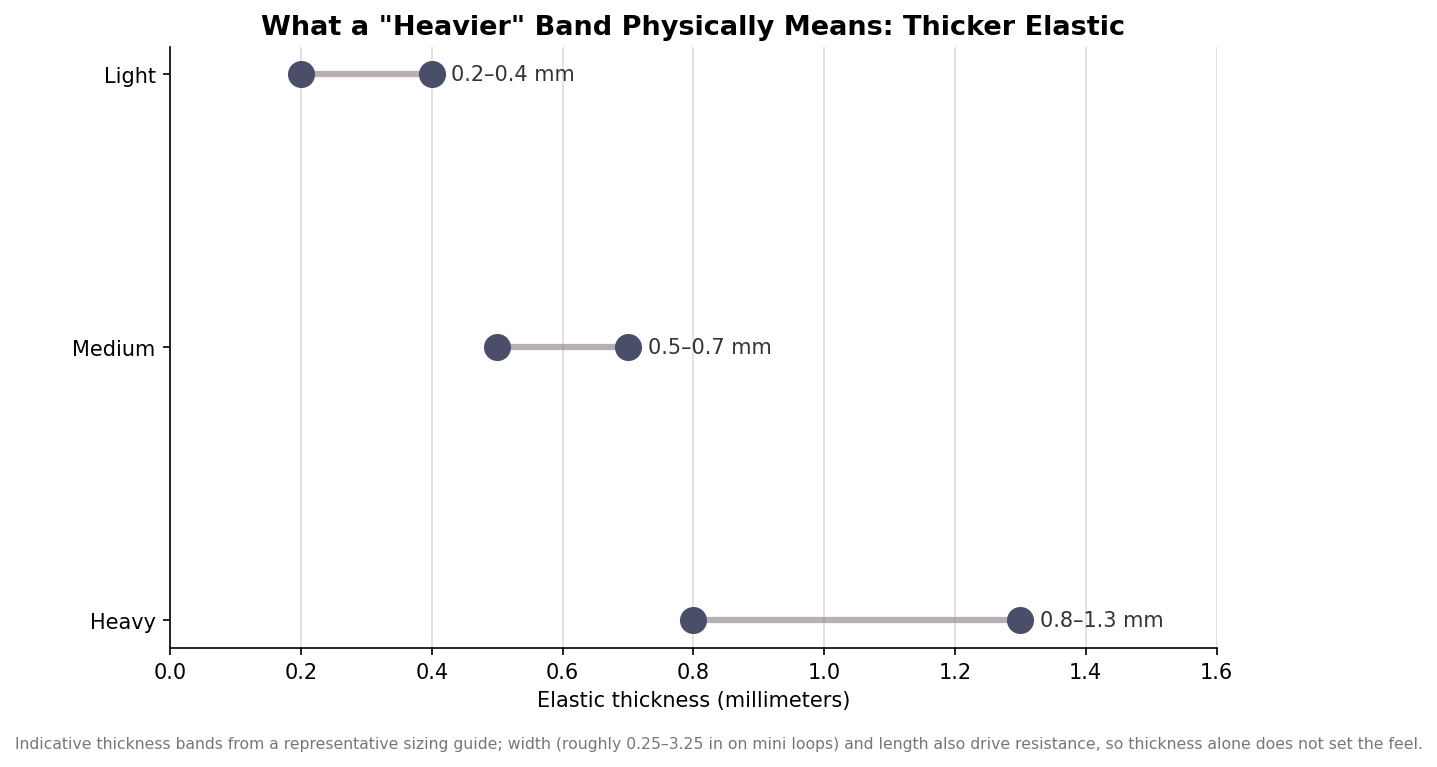
    Four physical variables do the real work. Width is the biggest lever on a fabric mini loop: narrow bands around a quarter inch deliver only about 5 to 15 pounds, while very wide bands past three inches can reach 70 pounds or more at full stretch. Thickness of the elastic is the next lever — a representative sizing guide puts light bands near 0.2 to 0.4 mm, medium around 0.5 to 0.7 mm, and heavy roughly 0.8 to 1.3 mm — and thicker elastic also changes the feel, engaging more abruptly rather than easing in. Length (the loop’s unstretched circumference) sets how far the band is pre-tensioned when it goes around the thighs; a shorter loop on the same body starts under more tension. And the material and construction — the ratio of elastic to woven fabric, the quality of the internal rubber, and the stitching — determine how linear and how durable that resistance is. Change any one of these and the pound figure moves, which is exactly why two same-labeled bands can feel worlds apart.

    Dumbbell range chart of elastic thickness by level: light 0.2 to 0.4 mm, medium 0.5 to 0.7 mm, heavy 0.8 to 1.3 mm
    Thicker elastic is part of what a heavier band means, but width and length set resistance too.

    Resistance is not one number — it climbs as the band stretches

    A band does not have a single “weight” the way a dumbbell does. The force it applies rises the more it is stretched, so the resistance at the bottom of a squat, where the band is barely elongated, is far lower than at lockout, where it is pulled tight. This is why quoted ranges are ranges: the low end is light early stretch and the high end is near full extension. For programming, that progressive load is a feature for glute work, where you want peak tension at the top of the movement. But it also means the honest way to describe a band is by the pounds it produces at a defined stretch — say, at 100 percent elongation — not a single headline number. When you compare vendors or set your own tiers, insist on a stated test condition, or you are comparing figures measured in different ways.

    How to specify a set that feels consistent

    The fix is to stop specifying by adjective and start specifying by measurement. Define each level in your line by a target resistance at a stated stretch percentage, with a tolerance, and hold the factory to it — for example, a “medium” that pulls a defined number of pounds at full elongation, plus or minus a set margin. Then lock the dimensions that produce it: width, unstretched length, and elastic thickness, because those are what the factory can actually control on the sewing floor. Ask for a physical pull test on a sample using a hanging scale or a force gauge, and confirm the steps between your levels are even; a common mistake is a set where light to medium is a small jump and medium to heavy is a cliff. Even, measured spacing is what makes a set feel like a coherent system rather than three unrelated bands that happen to share a logo.

    What this means when you order a branded line

    If you are a gym, trainer, or fitness brand putting your name on a set, the label is your promise and the pounds are what your customers actually experience. Treat the resistance spec as the core of the product and the print as the finish, not the other way around. Give your manufacturer measured targets and tolerances, get pull-tested samples before you approve a bulk run, and keep the same test protocol across reorders so your “medium” a year from now still feels like this year’s. Document the width, length, and thickness that produced the approved feel so a future batch can be matched even if staff change. Done that way, your levels stay honest, your reviews stay kind, and the only thing customers notice about the label is your brand — not that the “heavy” felt suspiciously like everyone else’s medium.

  • How to Specify a Custom Booty Band Set: Resistance, Sizing, and Construction

    How to Specify a Custom Booty Band Set: Resistance, Sizing, and Construction

    The hardest part of ordering a custom booty band set is not the fabric or the logo, it is the tension. Resistance-level names are not standardized across manufacturers, so one supplier’s “medium” can pull noticeably harder or softer than another’s, and a set that looks complete on paper can feel like two bands doing the same job once it ships. If you are building a private-label line for a gym, a trainer, or a fitness brand, specifying the set well up front is what keeps returns down and reviews high. Here is how to define resistance, size, and construction so the bands you receive match the ones you designed.

    Specify by tested force, not by the label word

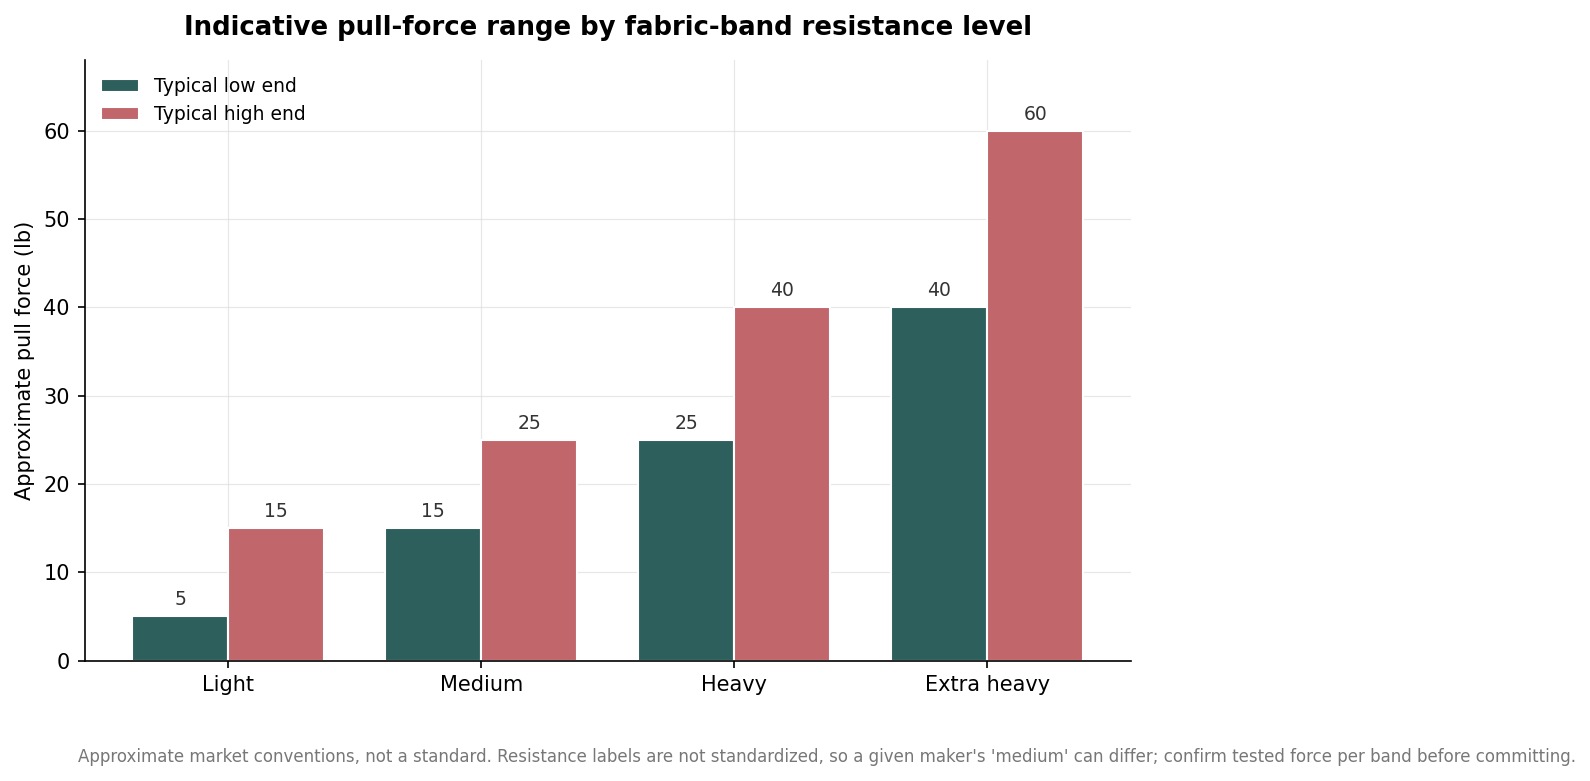
    Treat “light,” “medium,” and “heavy” as marketing labels, not measurements. Ask the manufacturer for the tested pull force of each band, ideally the load in pounds at a defined stretch such as the band elongated to a set percentage of its resting length. If the factory cannot give you a number, that is a signal to sample before you commit. The chart below shows the approximate force bands most makers cluster around, but the ranges overlap, which is exactly why the label alone is not enough to plan a set.

    Grouped bar chart of approximate low and high pull force in pounds for light, medium, heavy and extra heavy fabric resistance bands
    Resistance labels are not standardized, so the same name can span different pull forces between makers.

    The practical rule is to define your own ladder in force terms and hold the factory to it. For a three-band set, a common approach is to place the levels roughly at the low, middle, and high end of the range your customer needs, leaving a clear gap between each so the steps feel distinct. When two adjacent bands land within a few pounds of each other, users cannot tell them apart, and the set feels padded rather than progressive.

    Build a ladder with clean gaps

    Decide the span before the steps. A set aimed at glute activation and warm-ups can live entirely in the lighter half of the range, while a set marketed for lower-body strength needs to reach into heavy and extra-heavy territory. Once you know the top and bottom, space the middle bands evenly in force rather than by name. A four-band set that runs roughly light, medium, heavy, and extra heavy covers most general-fitness use, but a specialist line might drop the lightest band and add a second heavy step instead. The point is to design the ladder around your customer’s actual movements, then translate it into force targets the factory can hit.

    Match loop size to where the band sits

    Fabric booty bands are wide loops, typically around three inches (about eight centimeters) tall, and they commonly come in a few flat lengths. A representative size range is 13 inches, 15 inches, and 17 inches flat, which corresponds to progressively larger loop circumferences. Size changes the effective tension as much as the resistance rating does. A shorter loop is pre-stretched more on the same person, so it feels firmer and tends to sit higher, above the knee or across the thighs, while a longer loop feels easier and suits placement around the ankles or larger limbs. If your customer base spans a wide range of body sizes, offering two loop lengths at the same resistance can do more for fit and reviews than adding another resistance level. Keep the band width consistent across the set; the wide face is what distributes pressure and stops the band from digging in during hip work.

    Construction is what stops the roll and the snap

    The failure modes buyers complain about most are rolling and snapping, and both come down to construction. A quality fabric band uses a woven outer face for grip and durability with an internal latex or elastic layer that provides the stretch; the stretch does not come from the fabric itself. Seams should be sewn rather than glued or fastened with hook-and-loop, because a sewn closure is what survives thousands of stretch cycles without peeling apart. A non-slip inner surface, whether a silicone grip pattern or a rubberized strip, is what keeps a wide band from rolling into a rope mid-set. Latex thickness in the stretch layer commonly falls somewhere in the fractional-millimeter to roughly one-millimeter range depending on the resistance, and thicker internal layers generally read as higher resistance and longer life. When you sample, stretch each band hard, look at the seams, and check whether the grip holds on bare skin and over leggings, since that is how it will actually be used.

    Decoration and the order plan

    Fabric bands take branding several ways, and the fabric face decides which. Screen printing and heat transfer put a logo on the woven surface economically and suit one- or two-color marks. Dye sublimation allows full-color, all-over patterns but generally requires a light polyester face to take the dye, so it is not an option on dark fabric or on the latex itself. A woven or printed care label sewn into the seam is a low-cost way to carry sizing and brand name without touching the band face. Match the method to the artwork early, because a design built for sublimation will not translate to a screen print without changes.

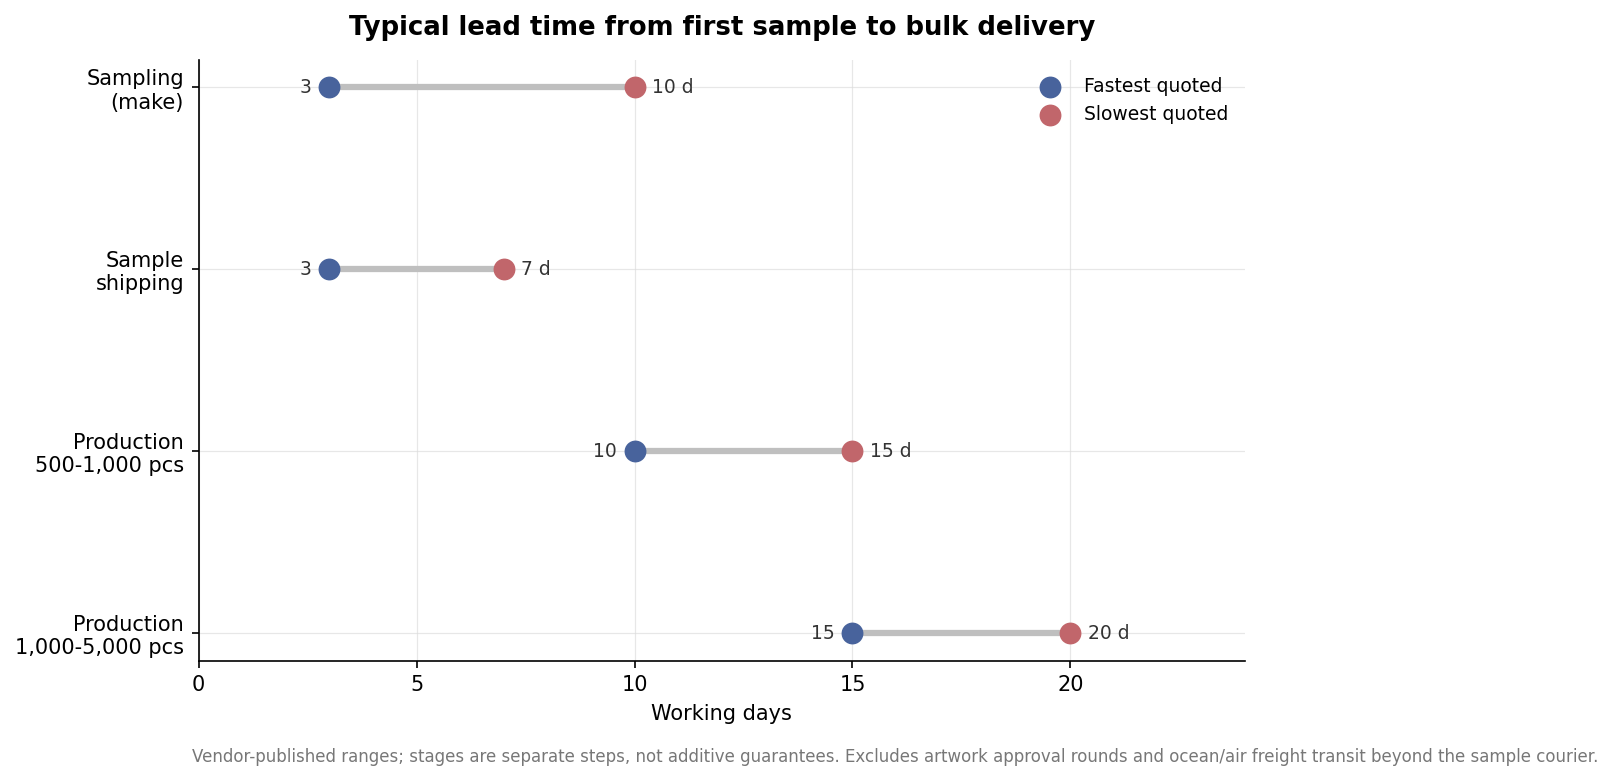
    On quantities and timing, sampling usually runs a handful of pieces per design, trial orders commonly sit in the low hundreds, and standard production typically starts around 500 pieces, with per-unit cost falling as volume rises. Build your launch calendar backward from realistic lead times rather than best-case ones. The timeline below shows vendor-published ranges for each stage; note that these are separate steps and do not include artwork approval rounds or ocean freight, both of which can add weeks. Plan the sample round first, lock the tested force and construction on an approved sample, and only then commit the bulk order, so the set your customers receive is the one you specified.

    Dot plot showing vendor-published lead time ranges in working days for sampling, sample shipping, and two production volumes
    Vendor-published lead-time ranges by stage; artwork approval and freight are additional.
  • Fabric vs Latex Booty Bands: Which to Choose for a Custom Line

    Fabric vs Latex Booty Bands: Which to Choose for a Custom Line

    If you are putting your logo on a resistance loop, the first real decision is not color or artwork. It is whether the band is woven fabric or molded latex. The two feel different in the hand, train the glutes differently, and behave very differently under a screen printer or an embroidery machine. Choosing the wrong one means a product that rolls up mid-set, cracks along the print, or simply does not carry your brand the way you pictured. This guide walks through the differences that matter when you are ordering in quantity for a gym, a studio, or a fitness brand.

    The core difference: woven elastic versus pure rubber

    A fabric booty band is a sleeve of elastic textile, typically a polyester or cotton blend woven around internal rubber threads. It is wide, matte, and grippy. A latex band is exactly what it sounds like: a continuous loop of rubber, thinner and stretchier, usually with a slightly tacky or glossy surface. That single material choice drives almost everything a buyer cares about downstream.

    The most visible difference in use is grip. Fabric bands are cut wide and lined with silicone grip strips on many models, so they stay put on the thighs during hip thrusts, lateral walks, and squats. Latex mini bands are narrower and tend to roll or ride up the leg as the muscle contracts, which is the single most common complaint you will hear from lifters. If your customers train glutes specifically, that stay-put behavior is a genuine selling point, and it is the reason fabric has taken over the “booty band” category even though latex is cheaper.

    Sizing and resistance: what the numbers actually mean

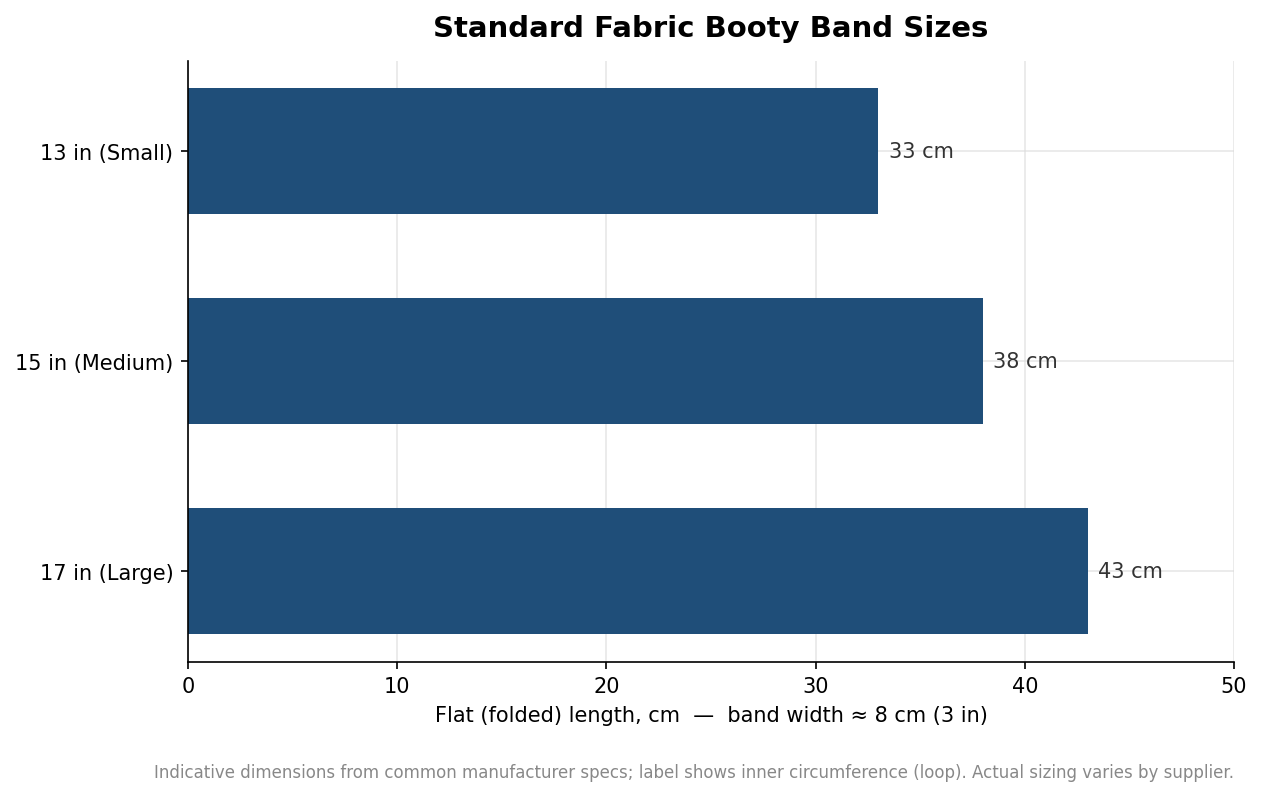
    Fabric bands are sold by circumference. The three sizes you will see most often are a roughly 13-inch loop for smaller frames or ankle work, a 15-inch loop as the everyday standard, and a 17-inch loop for larger thighs or above-the-knee placement. Laid flat, those correspond to folded lengths of about 33, 38, and 43 centimeters, at a band width near 8 centimeters. These figures are indicative of common manufacturing specs rather than an industry standard, so confirm the exact loop size with whichever factory you use.

    Horizontal bar chart of standard fabric booty band sizes: 13, 15 and 17 inch loops at 33, 38 and 43 cm folded length
    The three common fabric band sizes, shown as folded flat length at roughly 8 cm width.

    Resistance is where the two materials diverge sharply. Fabric bands are usually offered in two or three levels, marketed as light, medium, and heavy, because the woven construction limits how much you can vary the pull without changing the whole build. Latex bands stretch across a wider band of resistance and are commonly sold in sets of five graduated levels. Here is the important caveat for anyone writing product copy: there is no shared standard for what “medium” means in pounds. One brand’s heavy is another brand’s medium. If you plan to print a resistance rating on the band or the sleeve, define it against your own measured pull, and avoid implying a precise pound figure you cannot verify.

    Which material prints better

    This is the question most branding buyers underweight, and it usually decides the order. Fabric bands are a large, flat, matte canvas. They take screen printing, heat transfer, dye sublimation, and woven-in jacquard logos, and because the band is wide you get a long wrap of print real estate for a repeating logo or a full name. The print sits on textile, so it flexes with the weave rather than fighting it.

    Latex is harder to decorate well. Ink can be screen printed onto rubber, but the surface stretches far more than fabric, so a solid logo printed at rest will thin and can craze when the band is pulled to full extension. Embossing or a debossed logo built into the mold avoids the cracking problem but requires a tooling setup and a higher minimum order, and it gives you a subtle tone-on-tone mark rather than a bold color logo. As a rule of thumb, if the logo is the point, fabric wins; if you need a low unit cost and a discreet mark, molded latex can work.

    Cost, durability, and the tradeoff

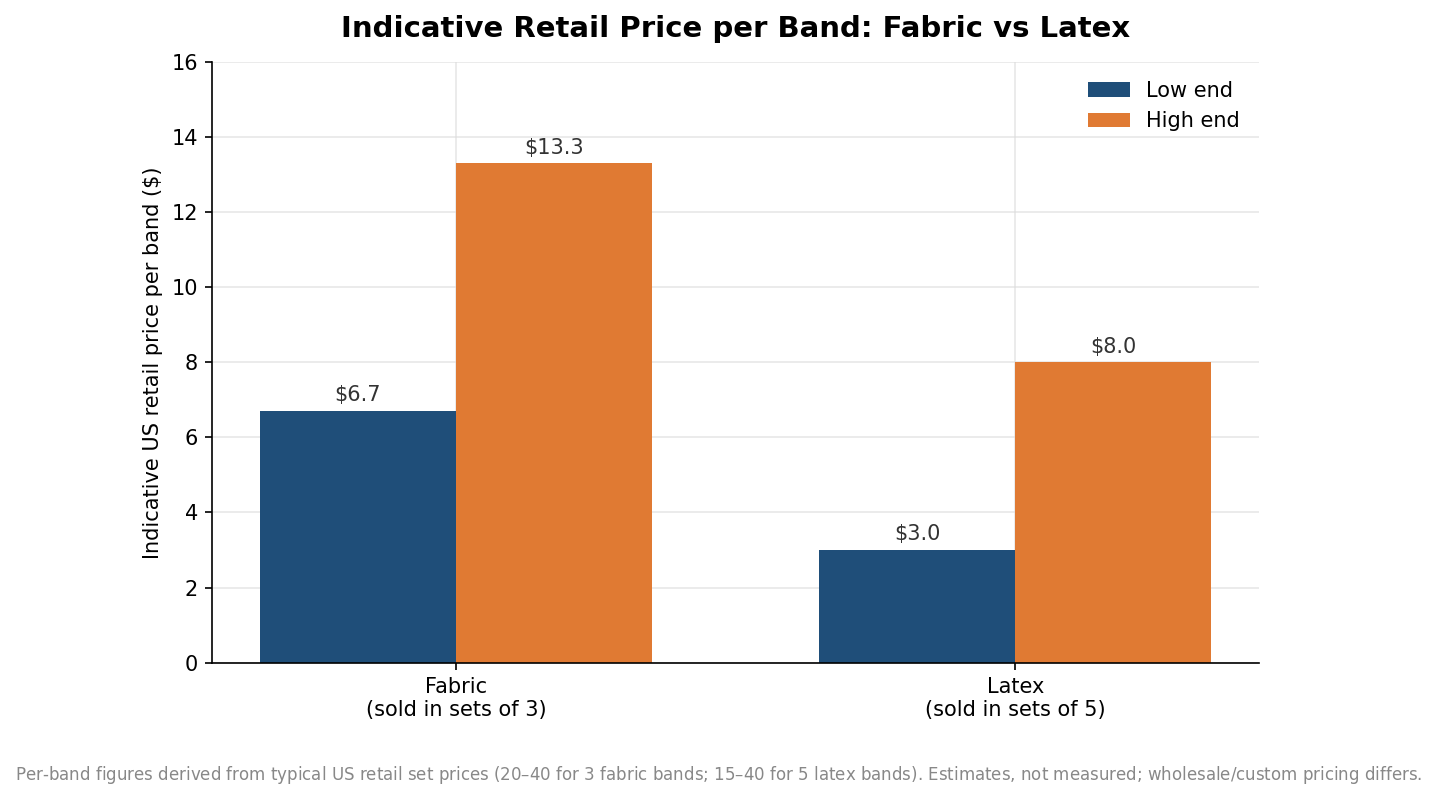
    Latex is the cheaper material and it shows up at retail. A set of five latex loops commonly sells for somewhere between 15 and 40 dollars, while a set of three fabric bands lands in a similar total range, which works out to a higher price per band because you get fewer of them. The chart below translates those typical retail set prices into a rough per-band figure. Treat these as indicative retail numbers, not a quote; wholesale and custom-decorated pricing depends on quantity, decoration method, and size.

    Grouped bar chart comparing indicative low and high retail price per band for fabric versus latex booty bands
    Typical retail set prices translated to a rough per-band cost; fabric runs higher per unit than latex.

    Durability cuts both ways. Fabric bands resist tearing and will not snap, but under heavy repeated load the elastic can gradually stretch out and lose some snap over months of hard use. Latex will hold its resistance longer if it stays intact, but it is vulnerable to abrasion; drag it across a rough gym floor or a concrete surface and it can nick and eventually fail at the nick. For a product that lives in gym bags and gets used on turf and rubber flooring, fabric’s floor tolerance is usually the safer bet, which matters when your brand is on the band and a failure reflects on you.

    How to spec your order

    Start from the customer, not the catalog. If you are outfitting a glute-focused studio or selling to lifters who care about the band staying above the knee, order wide fabric bands with silicone grip, in the 15-inch standard plus a 17-inch option, in two or three resistance levels, and put your logo on with screen print or a woven label. If you are making a giveaway or a promotional add-on where unit cost dominates and the mark can be subtle, a set of latex loops with a debossed logo will stretch your budget further.

    Whichever way you go, lock down three things before you approve a sample: the exact loop circumference and width, the decoration method and how it holds up when the band is stretched, and the resistance levels defined against a pull you have actually measured rather than a marketing label. Custom fabric bands are frequently produced at minimums in the low hundreds of units with lead times of a few weeks plus freight, so a single approved pre-production sample is worth the extra week it costs. Get those details right and the band becomes a piece of equipment people keep in their bag, carrying your name to the gym several times a week.